Each track type has a different type of constant charge strips, with each being powered differently. Follow the subsection below which suits your install.
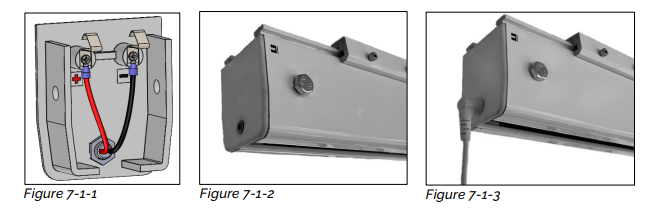
7.1 Installing a power supply to the constant charge strips (Track Type 1) – New Style
1. The end cap is fitted with two contact terminals which will touch onto the constant charge strips. (See figure 7.1.1). Therefore install all the safety components (end stop, safety bolt, and end cap) as per section 4.
2. Once the end cap is fitted, the charging unit can be connected through the jack plug found at the end cap. (See figure 7.1.3)
3. See section 8 for details on installing the charging unit to the wall.
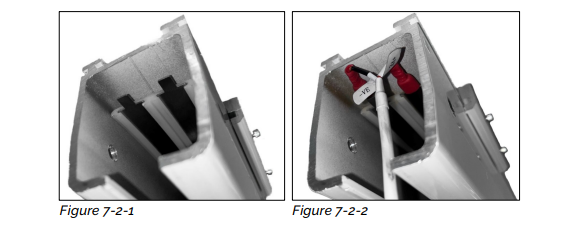
7.2 Installing a power supply to the constant charge strips (Track Type 1) – Old Style
1. The old style does not have any contact terminals on the end cap, therefore install all the safety components (end stop and safety bolt) excluding the end cap. (Refer to section 4)
2. Place a positive and negative sticker on either side of the track to determine a positive and negative terminal for the charge strips.
3. Attach the charging unit terminals to the contact strips. Matching the positive terminal to the positive strip and the negative terminal to the negative strip. (See figure 7.2.2)
4. Route the charging cable out through the track profile behind the end stop and before the end cap.
5. Fit the standard end cap into the track, The end cap is push-fitted into the track profile.
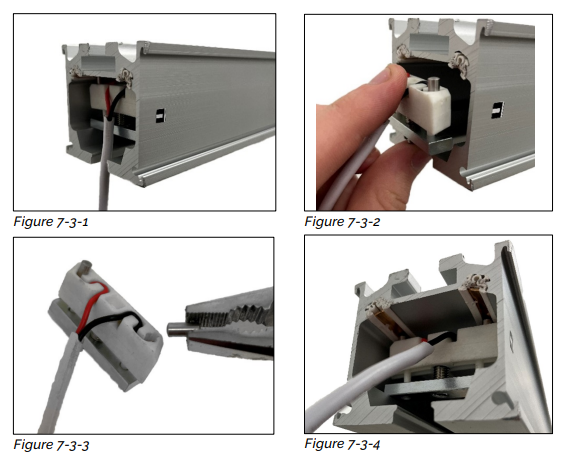
7 . 3 Installing a power supply to the constant charge strips (Track Type 2)
When installing the charging unit to a varying track type, we must use the current dock found in the track. You must first remove the existing dock from the track, remove the charging unit attached, and connect our charging unit to the existing dock. See details below on how to do this correctly.
1. Remove the safety components found in the track system for access. (Refer to section 4)
2. If not already done, apply a positive sticker to the side face of the track where the red wire of the dock is situated, and a negative sticker to the opposite face where the black wire of the dock is situated. (See figure 7.3.1)
3. To remove the dock from the track, use a 3mm Allen Key to loosen the grub screw and slide the dock out of the track. (See figure 7.3.2)
4. Using pliers, pull the contact dowels out of the dock as shown. (See figure 7.3.3)
5. Remove the existing wiring and route the new charging unit wires in the same fashion. (See figure 7.3.4)
6. Insert the dowel pins back into the charging dock.
7. Insert the dock back into the track and secure by tightening the grub screw with the 3mm Allen Key.
8. Make sure to refit the safety components to close the track system. (Refer to section 4)
9. See section 8 for details on installing the charging unit to the wall.
7.4 Installing a power supply to the constant charge strips (Track Type 3)
When installing the charging unit to a varying track type, we must use the current dock found in the track. You must first remove the existing dock from the track, remove the charging unit attached and connect our charging unit to the existing dock. See details below on how to do this correctly.
1. Remove the end cap from the track for access. (Refer to section 4)
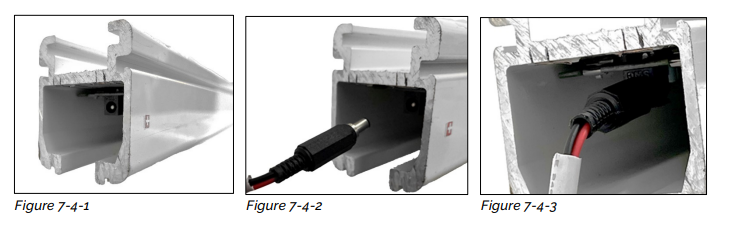
2. If not already done, apply a positive sticker to one face of the track, if the ceiling lift is already installed, then make sure red wire terminal of the charging beak is on the same side, then place a negative sticker on the opposite face of the track. (See figure 7.4.1)
3. Disconnect the current charging unit by unplugging the jack lead from the charging dock. (See figure 7.4.2)
4. Connect the new charging unit by plugging it into the port in the charging dock. (See figure 7.4.3)
5. Make sure to refit the safety components to close the track system. (Refer to section 4)
6. See section 8 for details on installing the charging unit to the wall.
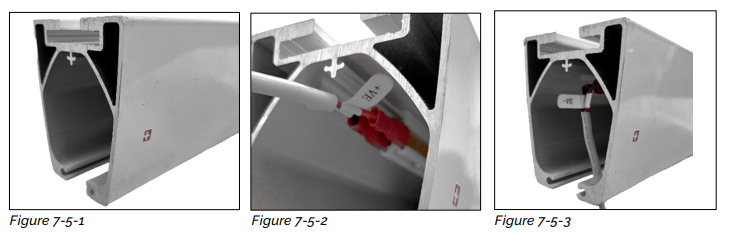
7.5 Installing a power supply to the constant charge strips (Track Type 4 and 5)
When installing the charging unit to a varying track type, we must use the current dock found in the track. You must first remove the existing dock from the track, remove the charging unit attached and connect our charging unit to the existing dock. See details below on how to do this correctly.
1. Remove the end cap from the track for access. (Refer to section 4)
2. If not already done, apply a positive sticker to the side face of the track where the red wire of the dock is situated, and a negative sticker to the opposite face where the black wire of the dock is situated. (See figure 7.5.1)
3. Disconnect the terminals of the old charging unit from the dock.
4. Connect the new charging unit to the docks terminals, with the wiring matching the stickers on the track face. (See figure 7.5.2)
5. The charging dock for track type 4 can be slid out of the track for easier modification.
6. Make sure to refit the safety components to close the track system. (Refer to section 4)
7. See section 8 for details on installing the charging unit to the wall.