This manual includes the fixing of all ceiling track systems into solid and hollow concrete, timber, steel works (beams), wall mountings (brick or block), and steel gantry fixed into a concrete or timber floor.
The ceiling track system should not be installed onto any other material without the correct authorization.
1.8 Ceiling Track System Alignment
A very important factor to take into account when installing the track system is alignment and accuracy. For the track system to run smoothly, it must be installed perfectly horizontally for the ceiling lift to traverse with ease, along with a straight line fixing to allow two tracks to successfully link between each other and allow a transition for the ceiling lift to pass between tracks. It is a critical part of ceiling track installation to allow the system to function.
1.8.1 Determining the Joist Positions for Ceiling Track Installation into Timber
The joist positions can be determined below the ceiling using a joist finder. Follow the procedure below to mark out the positions of the joists before any installation type into the timber. This will make the process and positioning of ceiling track systems installation much easier to navigate and position the fixings.
– A step ladder is required to gain access to the base of the ceiling.
– Starting from one side of the room, place the joist finder equipment up against the ceiling and move across.
– Once the first joist is found, the direction of the joist can be easily determined by moving the joist finder around the area.
– When the first joist and direction are determined, the room can be marked on a drawing. – Measure the area of the room and mark the distance to the first joist from a wall.
– Move the joist finder along the ceiling until the next joist has been found.
– Mark the second joist distance from the first.
– Continue until all joists have been discovered and marked onto the drawing to provide a clear view of the ceiling above.
1.8.2 Aligning the Track System Horizontally
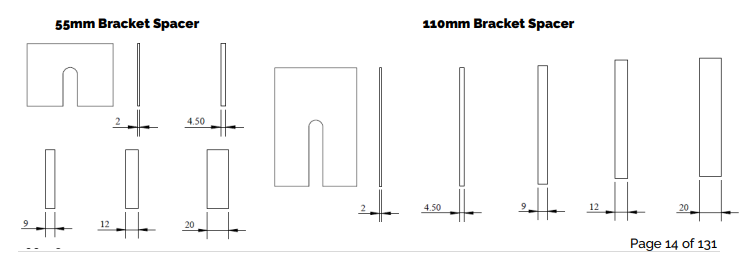
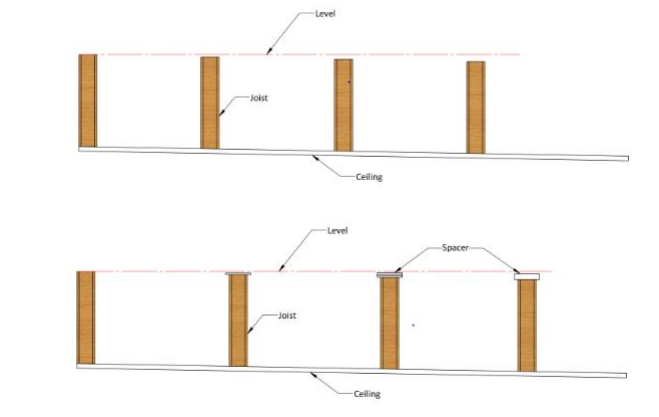
When a track system is installed up against the ceiling, it is not unusual for a ceiling to be slanted. To remedy this issue, a laser can be used to determine which track bracket is at the lowest height, from here, the remaining brackets must all be lowered to align horizontally with the lowest bracket. To do this, track bracket spacers are used to space between the ceiling and the track bracket to lower the height. Use as many track bracket spacers as required to ensure that all the track brackets become aligned horizontally. This can be seen using the laser.
The track bracket spacers are available in multiple sizes, from 2mm to 20mm. They are available for the 55mm and 110mm bracket spacer.

1.8.3 Aligning the Steel Channel Horizontally onto uneven Joists
A very important factor to consider when installing the steel channel along the top of any joists is to make sure that it is level and every joist is always in contact so that the weight is spread evenly across the joists. To ensure this, before installing the steel channel the joists should be checked to see if they are level with each other. This can be achieved by using a laser and tape measure. Simply place the laser on the highest joist and using a tape measure, measure from the top of the other joist to the red laser line to work out the distance which is required to be filled. A range of track spacers is available to be used to fill the specified gap.
See section 1.6.2 for the list of track spacers available.
