Fixing a threaded bar directly to a concrete ceiling through chemical resin is usually done where Zykon fixings are not suitable, this will be because the concrete is hollow, or is not deep enough. Depending on whether the concrete is hollow or solid, the process varies slightly.
When a threaded bar is fixed to the concrete, a minimum of 1.57” (40mm) of solid concrete is required before reaching the hollow state. It is recommended that a 3.39” (86mm) hole is drilled into the ceiling for a secure solid fixing.
The manufacturer’s instructions on the chemical resin must be followed when using the substance, while only using this manual as a guide. See section 1.6 for the gel and curing times on the chemical resin.
See section 2.1 for guidance on how to mark out the track bracket positions on the ceiling correctly before fixing any threaded bar to the ceiling.
Follow the guide below for the relevant fixing method.
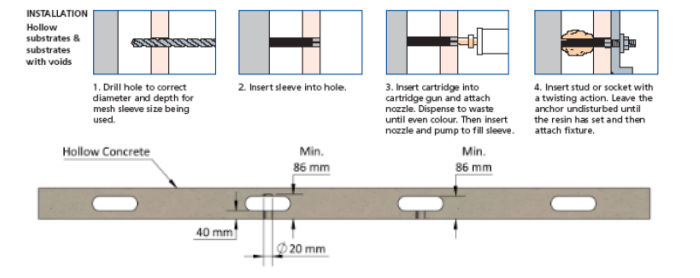
2.3.1 Fixing Threaded Bar to a Hollow Concrete Ceiling (Chemical Resin)
1. From the track bracket centre point marked on the ceiling, a threaded bar must be fitted on either side. Depending on any obstacles, mark out fixing positions on the ceiling. The two fixings are ideally fixed between 9.84” (250mm) and 23.62” (600mm) from each other. But it is acceptable for them to go up to 39.37” (1000mm) if necessary.
2. A laser should be used to ensure that the marked-out positions are in line with the centre hole.
3. Using a 0.79” (20mm) diameter drill bit, drill the two holes into the concrete. The holes must be a depth of 3.39” (86mm).
4. Once the holes have been drilled, they must be cleaned out, a hoover, air gun or hole brush will suffice.
5. Insert the fixing sleeve into the hole, with the sleeve being a length of 3.39” (86mm), it should fit into the hole perfectly.
6. Depending on the following method of fixing the track brackets to these fixing points, cut two pieces of M12 threaded bar to a suitable length.
7. The chemical resin can be placed into the gun and tested to ensure the two resins are mixing correctly. The two resins are individually coloured white and light grey, but when dispensing the resin out of its nozzle, they should mix into a dark grey colour. Ensure that this is the colour of the resin.
8. Inject the holes/sleeves with the chemical resin, the resin should fill 100% of the sleeve capacity.
9. Insert the two pieces of threaded bar into the sleeves. This will cause the resin to expand out of the sleeve and into the hollow concrete.
10. It is highly recommended that the threaded bar is twisted into the holes to provide additional strength and mix with the chemical resin.
11. The two bars will require support until the gel time has been reached.
12. Once the gel time is over the remaining fixings for the installation should be undergone, allowing the chemical resin time to cure. Refer to the gel and curing times in section 1.6.
13. During the curing time, the threaded bars can be secured with a fish plate and M12 half nut. This can be tightened up flush against the concrete.
14. Repeat this process to fit all the threaded bars into a hollow concrete ceiling with chemical resin.
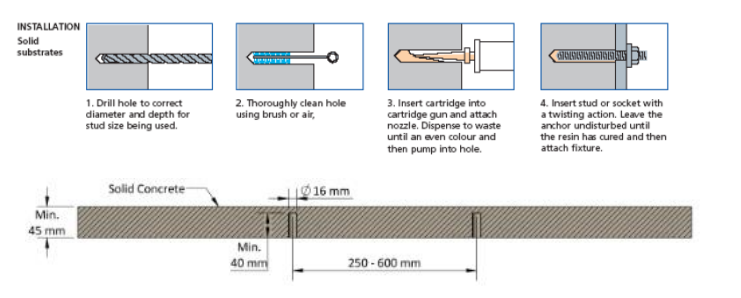
2.3.2 Fixing the Threaded Bar to a Solid Concrete Ceiling (Chemical Resin)
From the track bracket centre point marked on the ceiling, a threaded bar must be fitted on either side. Depending on any obstacles, mark out fixing positions on the ceiling. The two fixings are ideally fixed between 9.84” (250mm) and 23.62” (600mm) from each other. But it is acceptable for them to go up to 39.37” (1000mm) if necessary.
1. A laser should be used to ensure that the marked-out positions are in line with the centre hole.
2. Using a 0.63” (16mm) diameter drill bit, drill the two holes into the concrete. The holes must have a minimum depth of 1.57” (40mm) but are recommended to be around 86mm for additional fixing strength and security.
3. Once the holes have been drilled, they must be cleaned out, a hoover, air gun or hole brush will suffice.
4. Depending on the following method of fixing the track brackets to these fixing points, cut two pieces of M12 threaded bar to a suitable length.
5. The chemical resin can be placed into the gun and tested to ensure the two resins are mixing correctly. The two resins are individually coloured white and light grey, but when dispensing the resin out of its nozzle, they should mix into a dark grey colour. Ensure that this is the colour of the resin.
6. Inject the holes with the chemical resin, the resin should fill 50% of the hole capacity.
7. Insert the two pieces of threaded bar into the holes. This will force the resin to fill the full hole capacity.
8. It is highly recommended that the threaded bars be twisted into the holes to provide additional strength and mix with the chemical resin.
9. The two bars will require support until the gel time has been reached.
10. Once the gel time is over the remaining fixings for the installation should be undergone, allowing the chemical resin time to cure. Refer to the gel and curing times in section 1.4.
11. During the curing time, the threaded bars can be secured with a fish plate and M12 half nut. This can be tightened up flush against the concrete.
12. Repeat this process to fit all the threaded bars into a solid concrete ceiling with chemical resin.