The wall-to-wall fixing method is used when the ceiling is not suitable for fixing the track system, where the track system cannot be fixed to the ceiling at any point.
A wall bracket can be used in combination with ceiling fixings when required.
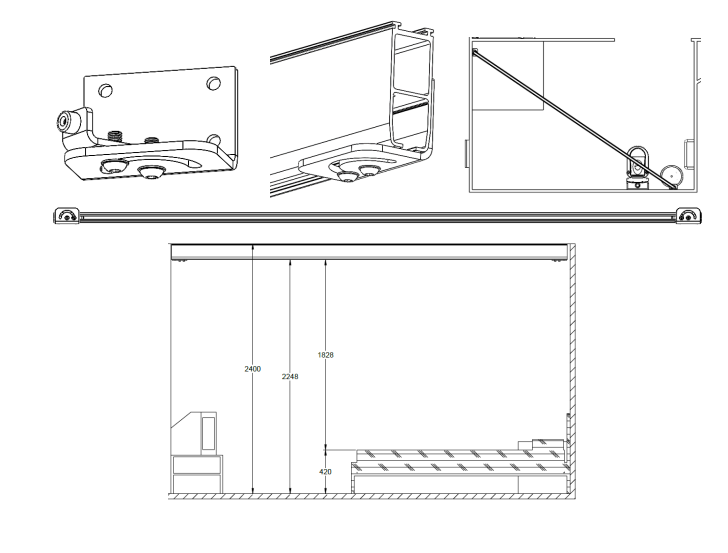
A wall-to-wall installation can be fitted in a straight line or in a diagonal direction as long as the fixings remain level.
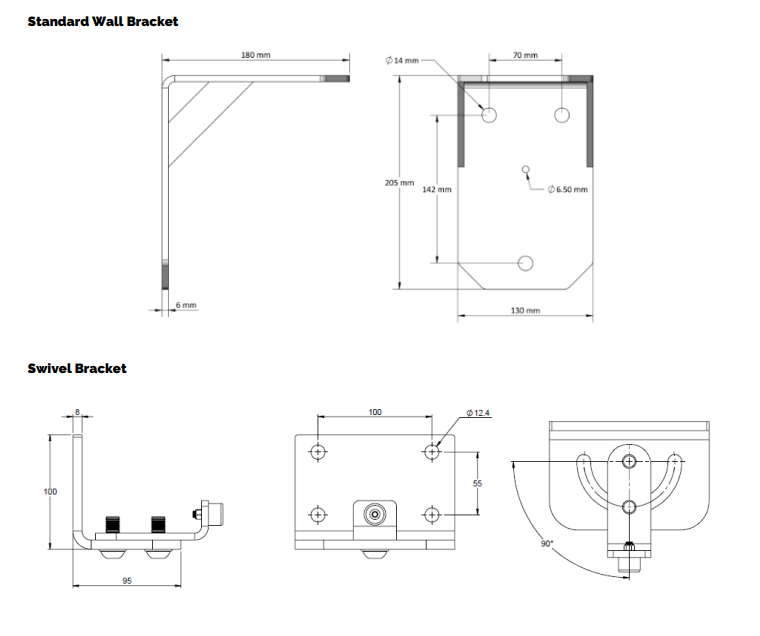
The wall-to-wall fixing method 1 has two options of wall brackets that can be used, this includes the standard wall bracket and the swivel wall bracket.
The standard wall bracket is typically used for straight-line spanning tracks whereas the swivel bracket offers the same option but can be used to span the track across the room at any angle up to 180°. This feature allows the track to be spanned along the wall face, and with one at either side of the room, this can potentially be used as the fixed track in a h-system.
The section below will give full instructions on the recommended method of installation for a ceiling track system into a wall fixing.
A full assessment should have been conducted to ensure that the wall is safe for installation, but the installation engineer must always be vigilant and ensure that the track fixing locations are safe, any signs of cracking, or any other damage to the wall should be avoided. Depending on the type of wall material, the various fixing methods must be followed.
For ceiling track wall fixings, only solid walls are suitable for installation. This includes brick and block materials. To ensure the wall material is suitable, drill a small hole (7mm) where the wall bracket is to be fitted to check the material of the wall. A wall-to-wall fixing cannot be fixed directly above a door or window as the fixing cannot be fixed to a lintel. This will not be a sufficient fixing point to bear the load of a ceiling track system.
5.1.1 Aligning a Wall-to-Wall Track Fixing
When a track system is installed onto a wall fixing or a wall-to-wall fixing, it is essential to ensure that the track system is level to ensure that the fixings will align. Follow the guidance below:
1. Measure the length from the wall-to-wall fixing positions to ensure that the distance between the two fixings will be suitable. See section 1 for maximum track spans. Choose a suitable track for the installation.
2. Along the full length of the track installation, any obstacles must be avoided, this includes obstacles such as light fixings, sprinklers, etc. To accommodate this, the wall fixings’ maximum height should be 50mm below the lowest obstacle on the ceiling. This will also provide a clearance gap for the track bracket fixings above the wall bracket’s upper face.
3. Determine a suitable location for the first wall bracket fixing. Align the wall bracket as close to the ceiling as possible to provide maximum track height. Depending on the wall type, the bracket must never be fixed to the top two bricks, as this will not provide sufficient strength to support the track system, always ensure that the fixing point is secure.
4. Place the wall bracket onto the wall and mark out all the hole fixings onto the wall with a marker/pencil.
5. Using a laser, the second bracket position can be marked on the opposing wall to provide a level fixing.
6. Once alignment is determined, ensure to place a wall bracket on the opposite wall and mark out all the hole fixings onto the wall with a marker/pencil.
5.1.2 Fixing the Wall Bracket to the Wall
Standard Wall Bracket
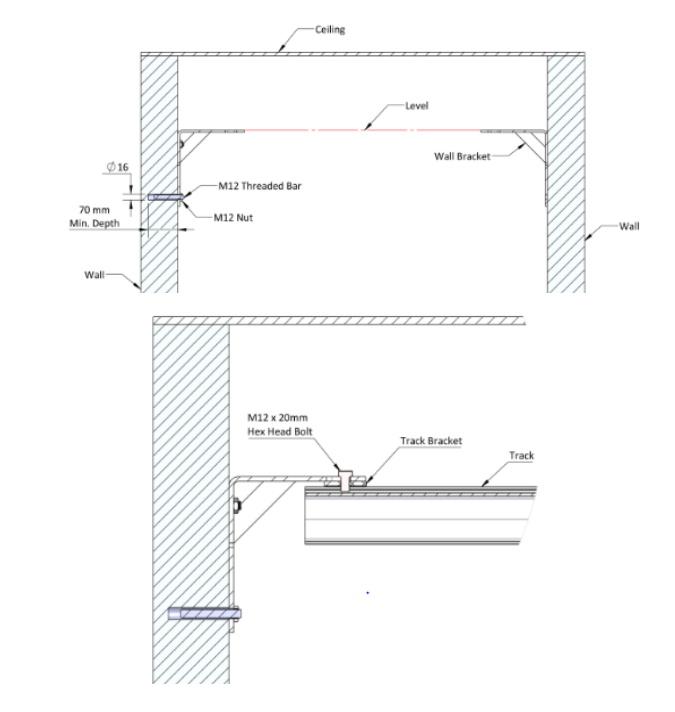
When fixing the wall bracket to the wall, the best fixing method is to fix the threaded bar directly into the wall through the process of chemical resin. There will be three fixings to support the wall bracket, and the threaded bar must be inserted a minimum of 2.8” (70mm) to provide suitable strength to support the ceiling track. The wall bracket must be installed into a wall that is in good condition, ensuring that there are no cracks or weaknesses found during placement.
When using the chemical resin, always ensure to follow the manufacturer’s instructions along with the guidance of this manual.
See section 5.1.1 for guidance on how to mark out the wall bracket positions on the wall correctly before proceeding to fix the brackets.
Follow the guidance below to fix the wall bracket to the wall.
1. Position the bracket against the wall, at the maximum height below the ceiling/false ceiling to achieve maximum track height.
2. Ensure that the hole positions are already marked on the wall. See section 5.1.1 if this step has been missed.
3. As the wall is solid concrete or similar block material, drill the three marked holes to a minimum depth of 2.8” (70mm), this depth provides suitable strength for the fixing to support the track. A 16mm drill bit diameter should be used.
4. Drill the center hole out to a depth of 1.2” (30mm) using a 7mm drill bit.
5. Once the holes have been drilled, they must be cleaned out, a hoover, air gun or hole brush will suffice.
6. Place the brown wall plug into the center hole.
7. Align the wall bracket with the drilled holes to ensure that they align correctly and that the wall bracket can be secured horizontally.
8. Fix the bracket in place by inserting the 7×30 screw into the center hole.
9. M12 threaded bar should be cut to allow a minimum of 2.8” (70mm) insertion into the wall along with an additional 0.8” (20mm) to allow for the wall bracket and fixings. Three M12 threaded bars are required for each wall bracket.
10. The chemical resin can be placed into the gun and tested to ensure the two resins are mixing correctly. The two resins are individually colored white and light grey, but when dispensing the resin out of its nozzle, they should mix into a dark grey color. Ensure that this is the color of the resin.
11. Inject the holes with the chemical resin, the resin should fill 50% of the hole capacity.
12. Insert the three pieces of threaded bar into the holes. This will force the resin to fill the full hole capacity.
13. It is highly recommended that the threaded bars be twisted into the holes to provide additional strength and mix with the chemical resin.
14. Place an M12 washer and M12 nyloc nut onto the threaded bars and tighten onto the wall bracket for secure fixing.
15. Repeat these steps to secure the second wall bracket on the opposing wall. The wall brackets must be fitted directly opposite to each other for level track fixing.
16. Allow each hole time for the chemical resin to cure, see manufacturers curing times in the table in section 1.
17. The track bracket can be directly bolted onto the wall brackets using an M12 bolt and nylon nut, ensure to fit the bolt through the track bracket and into the wall bracket, securing it from above with the nylon nut. Ensure to place the white cap on the bolt above.

Swivel Bracket
When fixing the swivel bracket to the wall, the best fixing method is to fix the threaded bar directly into the wall through the process of the chemical resin. There will be four fixings to support the wall bracket, and the threaded bar must be inserted a minimum of 2.8” (70mm) to provide suitable strength to support the ceiling track. The wall bracket must be installed into a wall that is in good condition, ensuring that there are no cracks or weaknesses found during placement.
When using the chemical resin, always ensure to follow the manufacturer’s instructions along with the guidance of this manual.
See section 5.1.1 for guidance on how to mark out the wall bracket positions on the wall correctly before proceeding to fix the brackets.
Follow the guidance below to fix the swivel bracket to the wall.
1. Position the bracket against the wall, at the maximum height below the ceiling/false ceiling to achieve maximum track height.
2. Ensure that the hole positions are already marked on the wall. See section 5.1.1 if this step has been missed.
3. As the wall is solid concrete or similar block material, drill the four marked holes to a minimum depth of 2.8” (70mm), this depth provides suitable strength for the fixing to support the track. A 12mm drill bit diameter should be used.
4. Once the holes have been drilled, they must be cleaned out, a hoover, air gun or hole brush will suffice.
5. Align the wall bracket with the drilled holes to ensure that they align correctly and that the wall bracket can be secured horizontally.
6. M12 threaded bar should be cut to allow a minimum of 2.8” (70mm) insertion into the wall along with an additional 0.8” (20mm) to allow for the wall bracket and fixings. Four M12 threaded bars are required for each wall bracket.
7. The chemical resin can be placed into the gun and tested to ensure the two resins are mixing correctly. The two resins are individually colored white and light grey, but when dispensing the resin out of its nozzle, they should mix into a dark grey color. Ensure that this is the color of the resin.
8. Inject the holes with the chemical resin, the resin should fill 50% of the hole capacity.
9. Insert the four pieces of threaded bar into the holes. This will force the resin to fill the full hole capacity.
10. It is highly recommended that the threaded bars be twisted into the holes to provide additional strength and mix with the chemical resin.
11. Place an M12 washer and M12 nyloc nut onto the threaded bars and tighten onto the wall bracket for secure fixing.
12. Repeat these steps to secure the second wall bracket on the same wall or opposing wall.
13. Allow each hole time for the chemical resin to cure, see manufacturers curing times in the table in section 1.
14. The track can be mounted onto the wall bracket from here. See section 10 for track install details.