When fixing the ceiling track system using the above fixing methods (beam clamps, window brackets and flange clamps), a wall fixing may be required at the end of the track system where no beams are present. A wall fixing is only suitable for solid walls, constructed of either brick or block.
The process below will give an example of how to fix the steel channel to the wall.
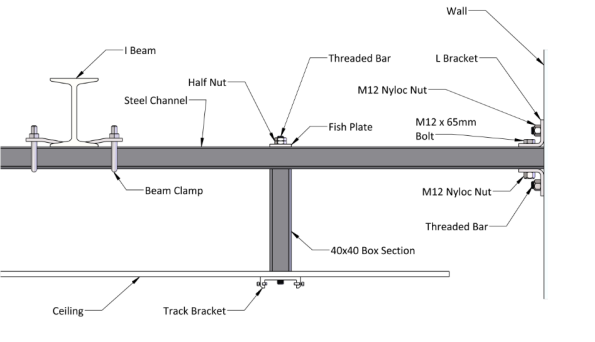
1. From the final steel beam, the steel channel must span up to and against the wall.
2. Two L-brackets will fix the steel channel to the wall from above and below as shown.
3. Place the L-brackets in their fixing position and mark the hole positions on the wall using a marker.
4. A typical wall fixing method will be used to fix the brackets to the wall, this requires the use of chemical resin.
5. Drill the holes into the wall to a minimum depth of 2.8” (70mm). The hole diameter must be 16mm.
6. Once the holes have been drilled, they must be cleaned out, a hoover, air gun or hole brush will suffice.
7. Align the L-brackets with the drilled holes to ensure that they align correctly and that the wall bracket can be secured horizontally.
8. M12 threaded bar should be cut to allow a minimum of 2.8” (70mm) insertion into the wall along with an additional 0.8” (20mm) to allow for the wall bracket and fixings. One M12 threaded bar is required per l bracket.
9. The chemical resin can be placed into the gun and tested to ensure the two resins are mixing correctly. The two resins are individually coloured white and light grey, but when dispensing the resin out of its nozzle, they should mix into a dark grey colour. Ensure that this is the colour of the resin.
10. Inject the holes with the chemical resin, the resin should fill 50% of the hole capacity.
11. Insert the threaded bar into the holes. This will force the resin to fill the full hole capacity.
12. It is highly recommended that the threaded bars be twisted into the holes to provide additional strength and mix with the chemical resin.
13. Place an M12 washer and M12 nyloc nut onto the threaded bars and tighten onto the l-bracket for secure fixing.
14. Repeat these steps to secure the second l-bracket.
15. Allow each hole time for the chemical resin to cure, see manufacturers curing times in the table in section 1.4.
16. With the steel channel sandwiched between the two L-brackets, secure the assembly by placing an M12x65 bolt through and locking off with a washer and nyloc nut.